Tutorials
Step-by-step guides to set up and use your PisonetX phone rental system.
Complete Setup
Watch the full getting started tutorial to install and configure PisonetX from scratch.
Getting Started — Complete Setup
Watch the complete getting started tutorial to install and configure PisonetX from scratch.
Super Admin via QR Code (No PC Required)
Set up Super Admin mode without a computer. Factory reset the phone and scan a QR code during the initial setup wizard.
Super Admin via Device Manager (Windows PC)
Install Super Admin mode using the PisonetX Device Manager on a Windows PC. Connect the phone via USB and follow the wizard.
Disable Default Launcher via Device Manager
Use Device Manager to disable the default Android launcher so customers cannot bypass PisonetX. This ensures the PisonetX launcher is the only home app available.
Normal Mode Setup
Quick and easy setup without factory reset. Install the APK and set as default launcher.
Super Admin via Device Manager (Windows PC)
Install Super Admin mode using the PisonetX Device Manager on a Windows PC. Connect the phone via USB and follow the wizard.
Insert Coin Test
Debug and test the coin insertion feature to make sure everything works correctly.
Telegram Bot Setup
Configure Telegram notifications for real-time alerts on adding time, sales, and device status.
Normal Mode Setup
The default setup method. Install the launcher directly — no factory reset needed.
Normal Mode Setup DEFAULT
The quickest way to get started. Install the PisonetX launcher directly on any Android phone — no factory reset needed.
Quick Start (4 Steps)
- Create an account — Sign up at pisonetx.com to get your license key
- Download & install the APK — Transfer to the phone or download directly. Allow "Install from Unknown Sources" if prompted.
- Open CPAdmin — Go to cpapp.pisonetx.com, login, and your device will appear when connected to the same network or via cloud.
- Activate your license — Enter your license key in the Licenses tab of CPAdmin.
Detailed Steps
- Download the latest PisonetX Launcher APK
- Transfer the APK file to the rental phone (via USB, Bluetooth, or direct download)
- Open the APK file and install it
- When prompted, set PisonetX as the default home launcher
- The phone is now a rental device — open CPAdmin to manage it
Super Admin Mode Setup OPTIONAL
Maximum security lockdown using Device Owner mode. Prevents users from uninstalling the app, accessing system settings, or bypassing the launcher. Best for public rental shops.
What Super Admin Prevents
- Uninstalling the PisonetX launcher
- Accessing system settings
- Changing the default launcher
- Installing unauthorized apps
- Factory resetting the device without admin access
Method A — QR Code Provisioning (No PC Required)
The easiest way to set up Super Admin. No computer needed — just factory reset and scan a QR code.
- Create an account — Sign up at pisonetx.com
- Factory reset the phone — Settings > System > Reset Options > Erase All Data, or use Recovery Mode (Power + Volume Down)
- Scan QR code during setup — During initial phone setup, tap the screen 6 times to open the QR scanner, then scan the PisonetX Device Owner QR code
- Activate your license — Open CPAdmin and enter your license key
Method B — Via Device Manager (Windows PC)
Use the PisonetX Device Manager on a Windows PC to install Super Admin mode via USB. Recommended if you have a computer available.
- Download Device Manager — Get it from the Downloads page
- Factory reset the phone — Same as Method A above
- Connect phone via USB — Enable USB Debugging in Developer Options
- Run Device Manager — Follow the wizard to install PisonetX as Device Owner
- Activate your license — Open CPAdmin and enter your license key
Disable Default Launcher via Device Manager
Use Device Manager to disable the default Android launcher so customers cannot bypass PisonetX.
CPAdmin Dashboard Setup
Access the web-based admin panel to manage all your rental devices from any browser.
- Create an account at pisonetx.com if you haven't already
- Open CPAdmin at cpapp.pisonetx.com in your browser
- Login with your account credentials
- Add devices — your rental phones will appear when connected to the same network or via cloud
- Verify connection — check that devices show "Online" status
Activate Your License
Each rental device needs a lifetime license key to unlock full features. Here's how to activate yours.
- Purchase a license from the pricing page
- Check your email or account dashboard for the license key
- Open CPAdmin and go to the Licenses tab
- Enter the license key and assign it to a device
- Verify activation — the device should show "Licensed" status
Vendo Centralize System
The centralize system uses one coinslot connected to an ESP32 board, which communicates with multiple rental phones via a WiFi router.
Components Needed
- Coin acceptor (coinslot)
- ESP32 development board
- WiFi router (dedicated for the vendo system)
- 5V power supply
- Connecting wires
How It Works
- Customer inserts coin into the coinslot
- Coinslot sends signal to ESP32 board
- ESP32 sends time command via WiFi router
- Rental phone receives command and adds time automatically
Hardware wiring diagram — click to view full size
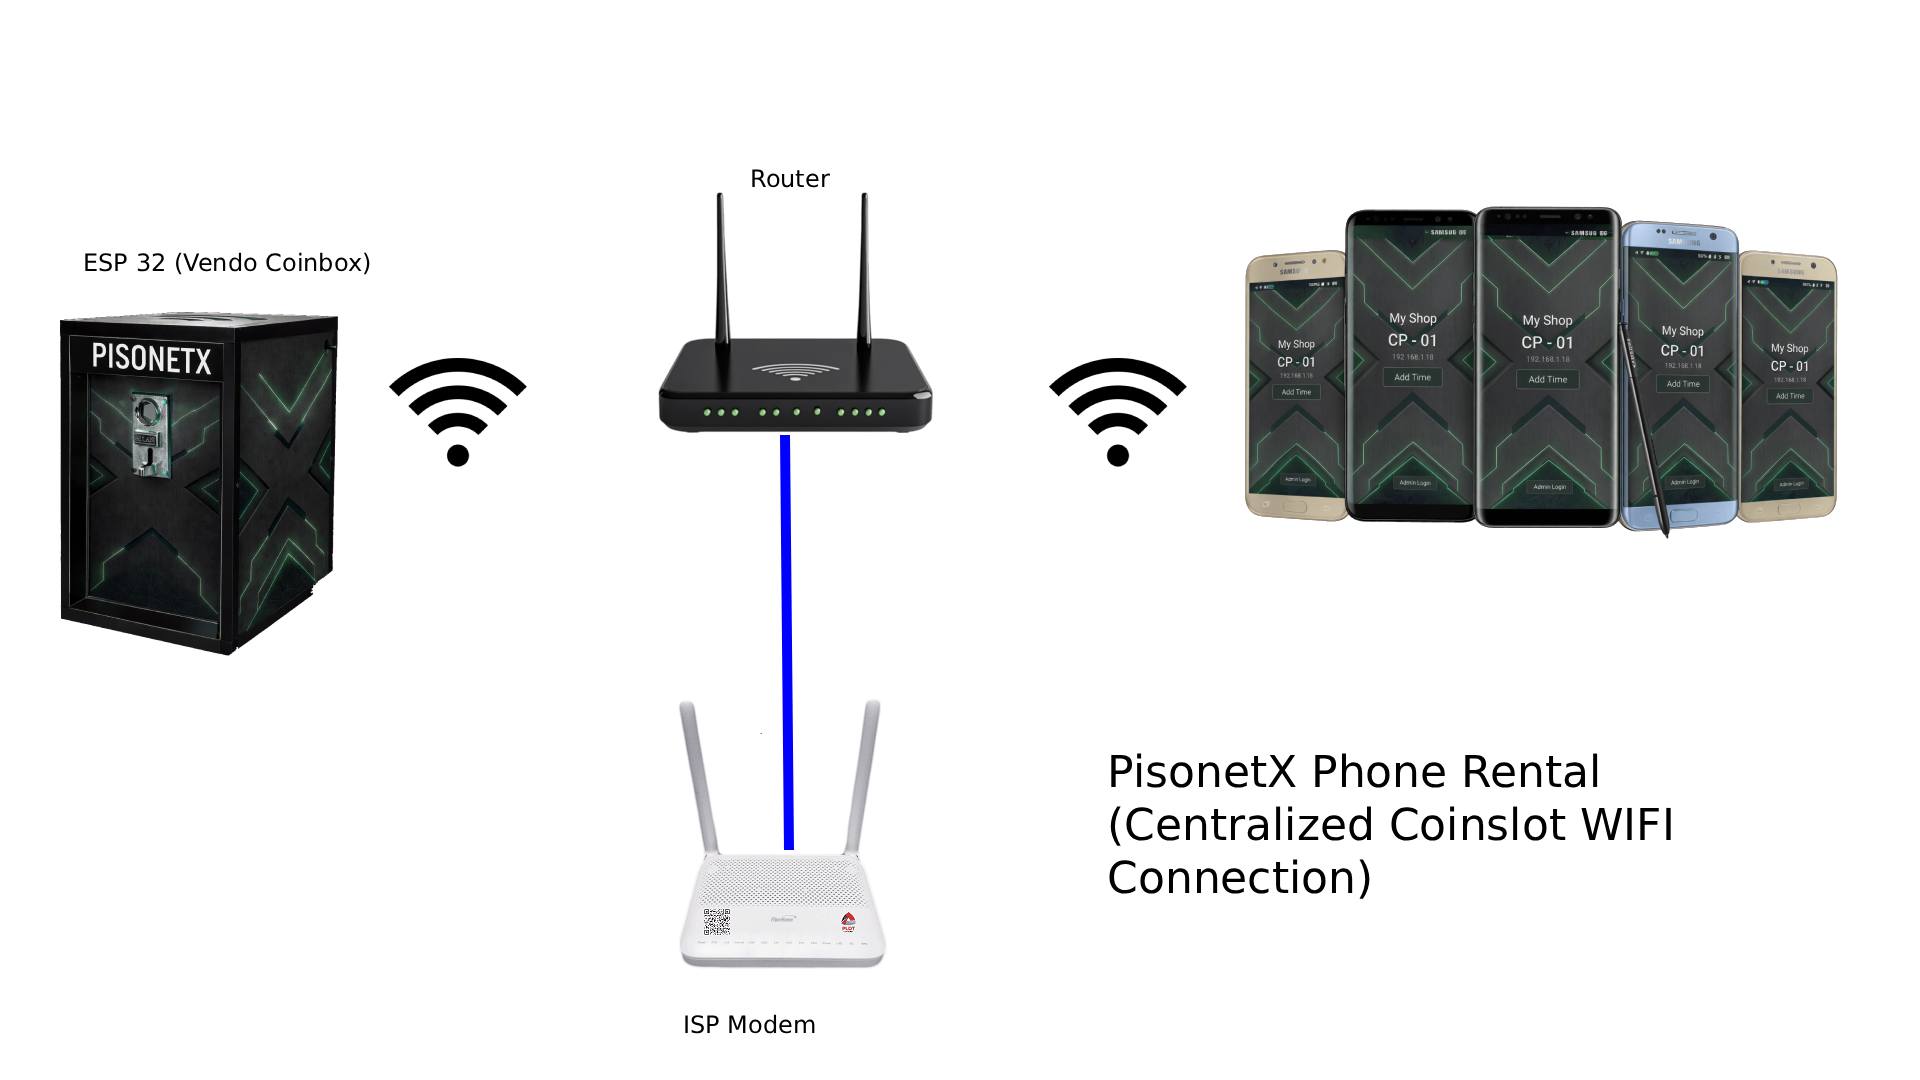
WiFi system setup — click to view full size
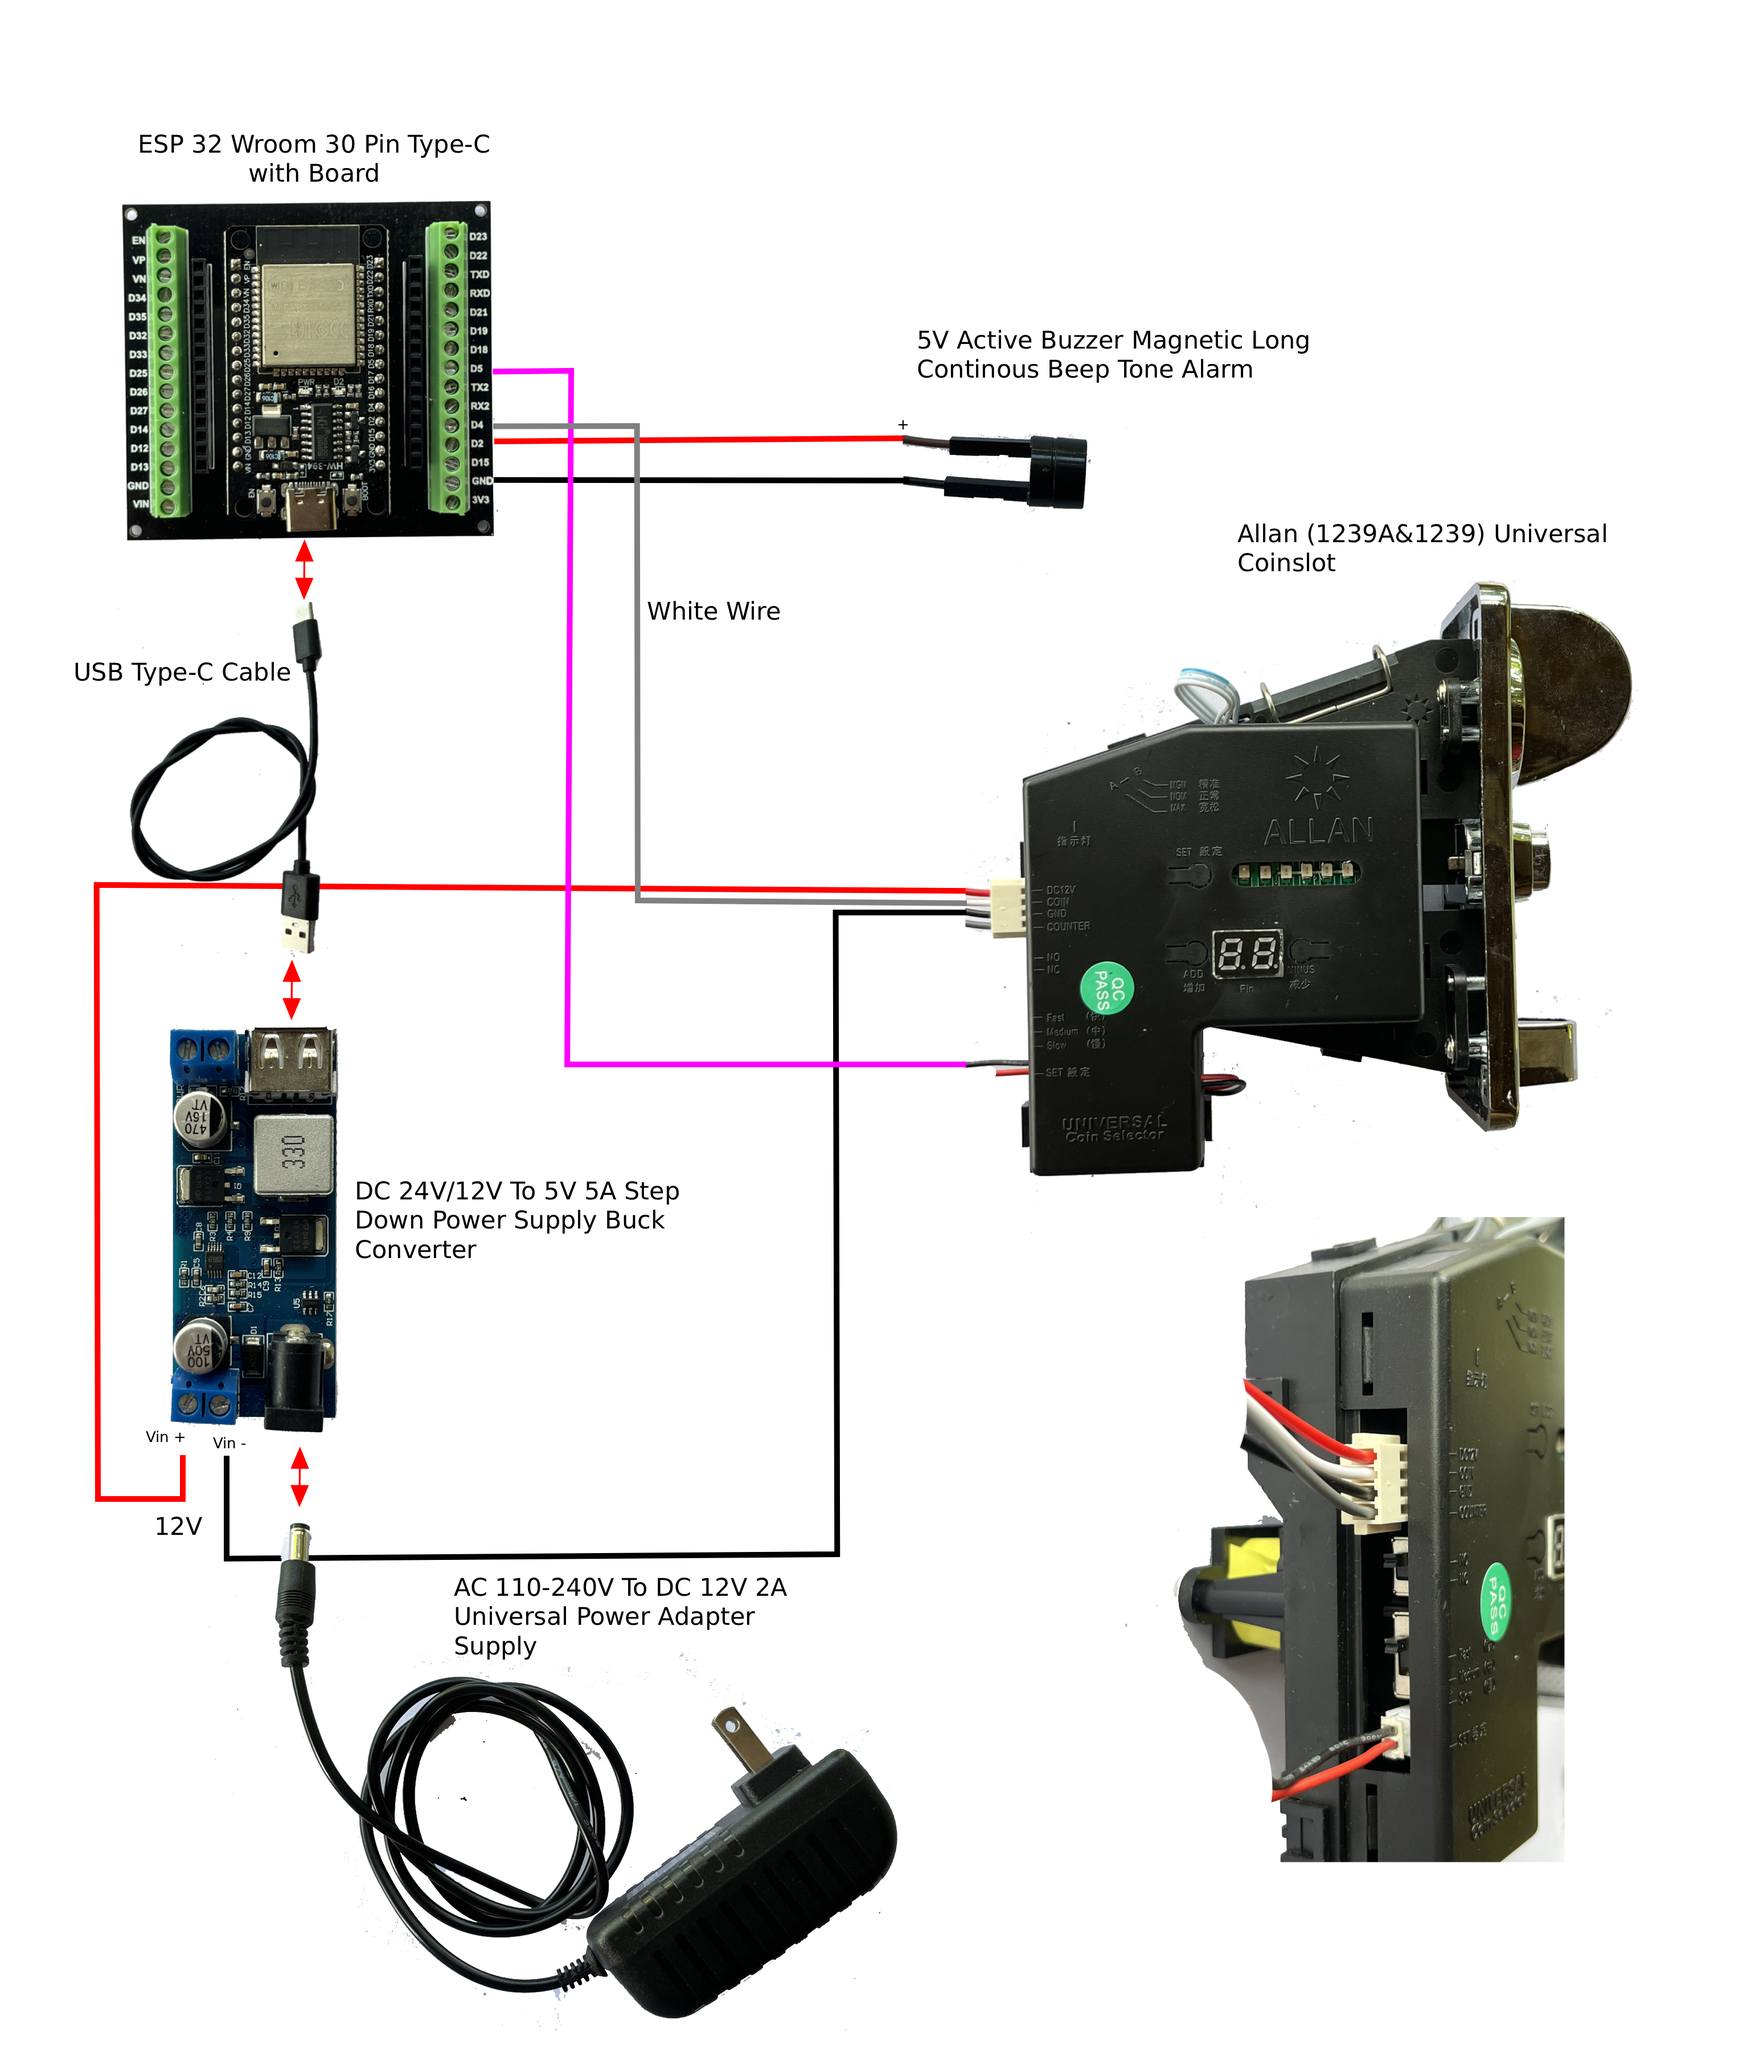
Vendo Individual Coinslot
The individual system uses a separate coinslot and Allan timer for each rental phone. Power-based — the phone charges only when time is active.
Components Needed (Per Phone)
- Coin acceptor (coinslot)
- Allan timer board
- Buck converter (step-down to 5V)
- USB cable
- 12V power supply
Wiring Steps
- Connect coinslot output to Allan timer input
- Connect Allan timer output to buck converter input
- Set buck converter output to 5V
- Connect buck converter output to USB cable
- Plug USB into the rental phone
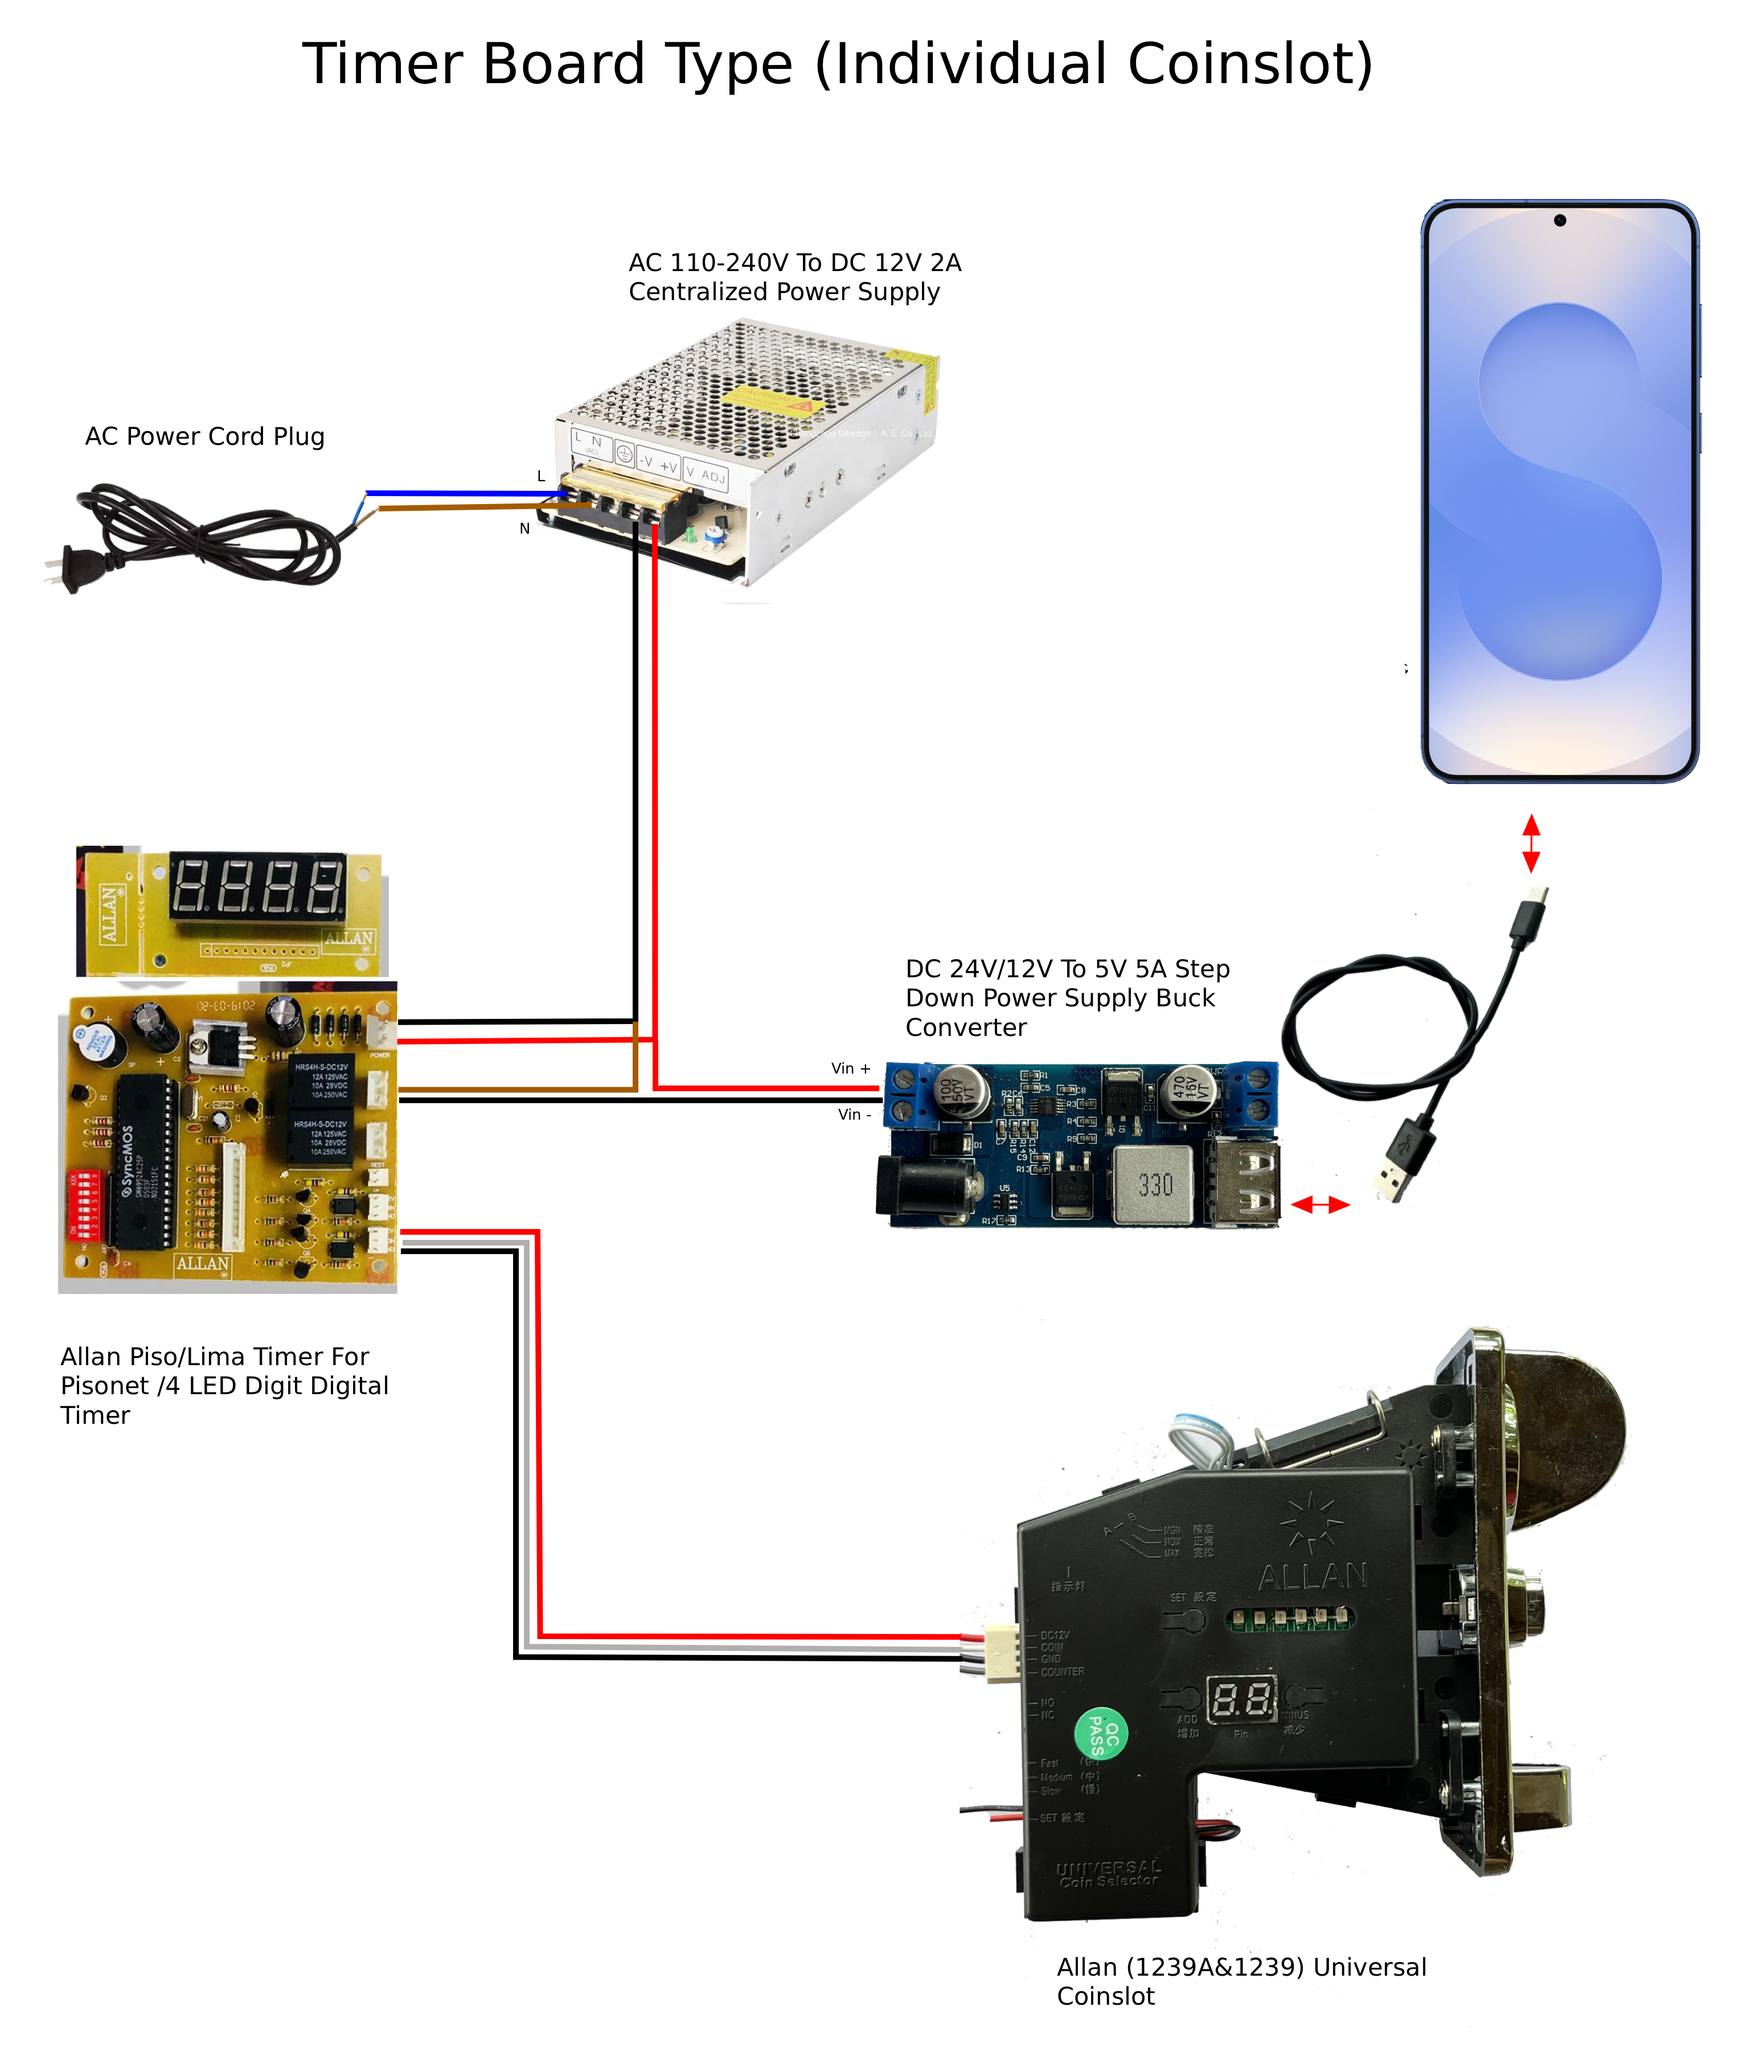
Timer board wiring diagram — click to view full size
Flash ESP32 Firmware
The ESP32 board needs PisonetX firmware to communicate with the coinslot and rental phones. Flash the firmware using a web-based flasher.
Steps
- Connect ESP32 to your computer via USB cable
- Install driver if needed (Windows users may need the CP210x driver)
- Open the web flasher at web.esphome.io in Chrome
- Select the COM port for your ESP32
- Upload the firmware file (.bin)
- Wait for flashing to complete (do not disconnect)
- Configure via Bluetooth after flashing
Troubleshooting
- ESP32 not detected? Install the CP210x USB driver
- Web flasher not working? Try NodeMCU PyFlasher as an alternative
- Flashing fails? Hold the BOOT button on ESP32 while clicking flash
Getting Started
PisonetX Control Panel turns any Android phone or tablet into a coin-operated internet kiosk. The app locks the device, shows a timer to customers, and unlocks when coins are inserted via the ESP32 coin slot hardware.
App Flavors
- Normal — Uses Android Accessibility Service to block apps and control the device. This is the version on Google Play.
- Device Owner — Uses Android Device Owner APIs for stronger device control. Can be set up via QR provisioning. No accessibility service needed.
- Provisioning — A minimal APK used only for QR-based device owner setup.
Lockscreen (Customer Interface)
The lockscreen is what customers see. It displays the remaining time, shop name, and device name.
- Countdown timer showing remaining minutes and seconds
- Insert coin button to connect to the vendo/coin slot
- Pause button (if enabled by admin) to save remaining time for later
- Battery percentage display
- Cloud connection status indicator
- Renter name display
Lockscreen Troubleshooting
- Timer is not counting down — Check if the device time/date is set correctly. Enable automatic date/time. For Board Timer mode, the timer only runs while the charger is connected.
- Lockscreen is not showing — Go to Admin Panel > Permissions > Display Over Other Apps and make sure PisonetX has permission. Restart the device if recently installed.
- Customer can still access the home screen — Set PisonetX as the Default Home App, or enable Kiosk Mode (Device Owner) or Accessibility Service (Normal).
Admin Panel
The admin panel is the control center for all settings. Access it by tapping the admin button on the lockscreen and entering the password or pattern. The default password is admin123 and the default pattern is 1234 (a straight line across the first four dots).
- Change admin password (default:
admin123) and pattern lock (default:1234) - Edit shop name and phone/device name
- Access all settings pages (Rental Rates, Timer Type, Vendo Settings, WiFi, Theme, Permissions, etc.)
Admin Panel Troubleshooting
- Forgot admin password — The default password is
admin123and the default pattern is1234. If you changed it and forgot, clear app data via Settings > Apps > PisonetX > Storage > Clear Data (WARNING: resets ALL settings) - Admin panel is laggy — Close background apps or restart the device.
- Cannot access admin in kiosk mode — Try long-pressing on the lockscreen timer area.
Rental Rates
Rental rates define how much time a customer gets per coin/payment.
- Add multiple rates with custom names, prices, and durations
- Default — Base pricing rates used for coin-operated billing
- Promo — Add-on packages that can be added continuously on top of default rates
- Rates are displayed as quick-add buttons in the Add Time panel
How to Set Up Rates
- Go to Admin Panel > Rental Rates
- Tap the + button to add a new rate
- Enter the Name (e.g., "1 Peso"), Price (e.g., 1), and Duration in minutes (e.g., 6)
- Select the Type (Default or Promo)
- Save
Timer Modes
PisonetX supports two timer modes depending on your hardware setup.
Phone Timer (Default)
- Standard countdown timer
- Time is added when coins are inserted
- Sale is recorded immediately when coins are inserted
- Time persists even if the app is restarted
Board Timer (Coin Charger Station)
- Timer starts when the charger is connected
- Timer stops and locks when the charger is disconnected
- Sales are recorded incrementally based on active runtime
- Charger disconnect ALWAYS triggers an alarm
Pause & Resume Sessions
Allow customers to save their remaining time and resume later.
- Customer taps Pause on the lockscreen
- Enters their name to identify the session
- Remaining time is saved
- Later, customer (or admin) can Resume by finding their name in the paused sessions list
Troubleshooting
- Rates not showing — Make sure you have at least one rate with type "Default".
- Board Timer not starting — Make sure the device is physically connected to a charger.
- Board Timer alarm keeps going off — The alarm triggers every time the charger is disconnected. This is by design.
- Pause button not showing — Enable "Allow User Pause" in Admin Panel > Other Settings.
Insert Coin / Vendo Connection
The app connects to the ESP32 coin slot hardware via WiFi/WebSocket.
- Auto-connect to ESP32 vendo via IP address and password
- Auto-discovery of vendo devices via mDNS
- 30-second connection timeout with auto-retry (up to 2 attempts)
- Coin received triggers time addition automatically
How to Set Up Vendo Connection
- Make sure the ESP32 coin slot is powered on and connected to the same WiFi network
- Go to Admin Panel > Vendo Settings
- Enter the Vendo IP Address or use Auto Discover
- Enter the Vendo Password (default:
12345678) - Tap Test Connection to verify
- Save settings
Troubleshooting
- Cannot connect to vendo — Make sure the phone and ESP32 are on the same WiFi network. Check if the ESP32 is powered on. Try Auto Discover.
- Coins not being detected — Check the physical coin slot for jams. Verify the ESP32 is receiving signals. Try reconnecting.
- Connection drops frequently — Move the phone closer to the WiFi router. Check for interference. Ensure stable power supply for ESP32.
Security Alarms
Security alarms protect the device from theft and unauthorized use.
- Charger Disconnected — Triggers when the charger is unplugged
- Device Covered — Triggers when ambient light sensor detects 0 lux for 3+ seconds
- WiFi Disconnected — Triggers when WiFi connection is lost
- Time Ended — Triggers when customer's time runs out
- Unknown WiFi — Triggers when device connects to unrecognized WiFi
- Permission Alarm — Triggers when required permissions are missing
Blocking Options
- Block Recent Apps — Prevents customers from accessing the recent apps screen
- Block Settings — Prevents opening the Settings app
- Block Status Bar — Prevents pulling down the notification bar
- Block Power Button — Prevents the power menu (Normal flavor only)
Kiosk Mode (Device Owner Only)
Provides the strongest level of device control.
- Disables Home, Back, and Recent Apps buttons
- Locks the device to PisonetX
- Block factory reset, safe mode boot, and app installation
- Admin login temporarily exits kiosk mode for configuration
Accessibility Service (Normal Flavor)
Used to block apps and control the device UI.
- Block specific apps, Settings, status bar, recent apps, power button
- Partial Mode — Only blocks Settings and other launchers
- Full Mode — Blocks ALL apps (used when time = 0)
Pattern Lock Security
- 3x3 grid pattern lock (default pattern:
1234— a straight line across the first four dots) - Configurable max failed attempts (default: 5) and lockout duration (default: 30 seconds)
- Can be used alongside or instead of password (default password:
admin123)
Required Permissions
- Battery Optimization — Set to "Don't Optimize"
- Alarms & Reminders — Allow
- Display Over Other Apps — Allow
- Auto Start — Enable
- Default Home App — Select PisonetX
- Accessibility Service — Enable (Normal flavor only)
Troubleshooting
- Alarm not sounding — Check alarm volume in Security Alarm Settings. Make sure device volume is not muted.
- Accessibility Service keeps turning off — Disable battery optimization. On Xiaomi/Huawei/Oppo/Vivo, set to "No Restrictions" or "Unrestricted".
- Kiosk Mode not available — Requires Device Owner setup via QR provisioning.
- Permission keeps resetting after reboot — Enable Auto Start and disable battery optimization.
WiFi Settings & Whitelist
Control which WiFi networks the device can connect to and trigger alarms for unknown networks.
- Scan and view available WiFi networks
- Mark specific networks as allowed (whitelist)
- SSID + BSSID matching for precise network identification
- Trigger alarm when device connects to unknown network
How to Set Up WiFi Whitelist
- Go to Admin Panel > WiFi Settings
- Tap Scan to find nearby networks
- Tap on a network to add it to the whitelist
- Enable Unknown WiFi alarm in Security Alarm Settings
Telegram Bot Notifications
Get notified on Telegram when events happen on your kiosk devices.
- Time added (coin inserted)
- Time ended (session finished)
- Security alarm triggered
- Device offline
How to Set Up Telegram
- Create a Telegram bot via @BotFather
- Get the Bot Token from BotFather
- Send a message to your bot
- Go to Admin Panel > Telegram Settings
- Enter the Bot Token, tap Get Chat ID, and save
Cloud Remote Management
Manage your kiosk devices remotely from anywhere via the PisonetX cloud dashboard.
- Real-time device monitoring
- Remote add/reduce time and pause/resume sessions
- Device online/offline status with keep-alive heartbeat
- Communication encrypted using XOR encryption
Troubleshooting
- WiFi alarm keeps triggering — Whitelist uses both SSID and BSSID. Re-scan and re-add the network.
- Cannot scan WiFi — Grant Location Permission and enable location services (Android 10+).
- Not receiving Telegram notifications — Verify Bot Token and Chat ID. Send a message to the bot first.
- Device shows "Offline" on cloud — Check internet connectivity. Restart the app to force reconnection.
Theme & Wallpaper
Customize the look and feel of the lockscreen and admin panel.
- Download wallpapers from the PisonetX gallery (up to 50)
- Upload custom wallpaper from device gallery (auto-compressed to under 1MB)
- Color theme auto-generated from wallpaper
- Manual color theme picker for background, timer text, timer background, and buttons
Dashboard Layout Settings
Customize how apps are displayed on the customer dashboard.
- Adjustable grid columns (3 to 6 columns)
- App icon size slider
- App text/label size slider
- Real-time preview as you adjust
Brightness Control
- Brightness slider (0% to 100%)
- Auto brightness toggle
- Accessible from the lockscreen (if enabled)
Manage Apps
Control which apps are visible and accessible on the device dashboard.
- View all installed apps with icons
- Search/filter apps by name or package name
- Toggle apps on/off (hide/show on the dashboard)
- Hidden apps cannot be launched by customers
Troubleshooting
- Wallpaper not loading — Check internet connectivity or grant Storage Permission for uploads.
- Brightness slider not working — Grant the "Write Settings" permission to PisonetX.
- App hidden but still accessible — Enable Accessibility Service (Normal) or Kiosk Mode (Device Owner).
- Newly installed app not in list — Pull to refresh or restart the admin panel.
License & Trial
- New installations get a 72-hour free trial with all features
- After trial expires, time cannot be added (coins will not register)
- License is checked periodically (every 10 seconds)
Common Bugs & Fixes
- App crashes on startup — Clear app data via Settings > Apps > PisonetX > Storage > Clear Data (resets all settings)
- Screen goes black — Re-enable Display Over Other Apps permission
- Timer resets after reboot — Grant Storage Permission and enable Auto Start
- Coin slot stops working — Check WiFi connection to ESP32. Restart the ESP32.
- Device overheating — Reduce brightness and use a ventilated case
- "Permission Alarm" keeps triggering — Grant ALL permissions in Admin Panel > Permissions
- Sales report wrong amounts — Review rental rates. Board Timer uses runtime-based billing.
- App restarts randomly — Disable battery optimization. On Xiaomi/Huawei/Samsung/Oppo, adjust manufacturer-specific battery settings.
- Cannot set as Default Home App — Go to Settings > Apps > Default Apps > Home App. Use Kiosk Mode for Device Owner.
Telegram Bot Notifications
Set up a Telegram bot to receive real-time notifications when customers insert coins, timers expire, or devices go offline.
Setup Steps
- Open Telegram and search for
@BotFather - Create a new bot by sending
/newbot - Give your bot a name and username (e.g., "MyShop_PisonetX_Bot")
- Copy the bot token provided by BotFather
- Get your Chat ID by messaging your bot and checking the API
- Enter bot token and chat ID in CPAdmin device settings
- Test notification by adding time to a device
Device Settings & Customization
Configure each rental device to match your business needs — from pricing to appearance.
Rental Time Rates
Set how much time customers get per coin or per payment. You can configure multiple rate tiers.
- Open CPAdmin and select a device
- Go to Admin Panel > Time Rates
- Set the peso amount and corresponding time (e.g., ₱5 = 30 minutes)
- Save and the device will update automatically
Theme & Wallpaper
- Open Admin Panel > Theme
- Upload a custom wallpaper image
- Adjust theme colors if desired
Pattern Lock
- Open Admin Panel > Pattern Lock
- The default pattern is
1234(a straight line across the first four dots) — change this for security - Set a custom pattern for admin access on the device
- This prevents customers from accessing admin features
Other Settings
- Alarm sound — plays when timer is about to expire
- Auto-lock — automatically locks the device when time runs out
- Forced mute — prevent customers from changing volume
- App whitelist — only allow specific apps to be used
Account & License Management
Manage your PisonetX account, license keys, and user roles.
License Management
- View all active licenses in CPAdmin > Licenses tab
- Transfer a license from one device to another
- Check license expiry and renewal status
Bantay (Cashier) Role
Set up limited-access accounts for your shop attendants:
- Go to your account settings on pisonetx.com
- Create a Bantay user with limited permissions
- The Bantay can add/reduce time but cannot change settings
- Monitor Bantay activity via logs in CPAdmin
Account Recovery
Lost access to your account? Use the recovery tool to reset your password.